Step Flashing vs. Continuous Flashing: Which One Does Your Roof Actually Need?
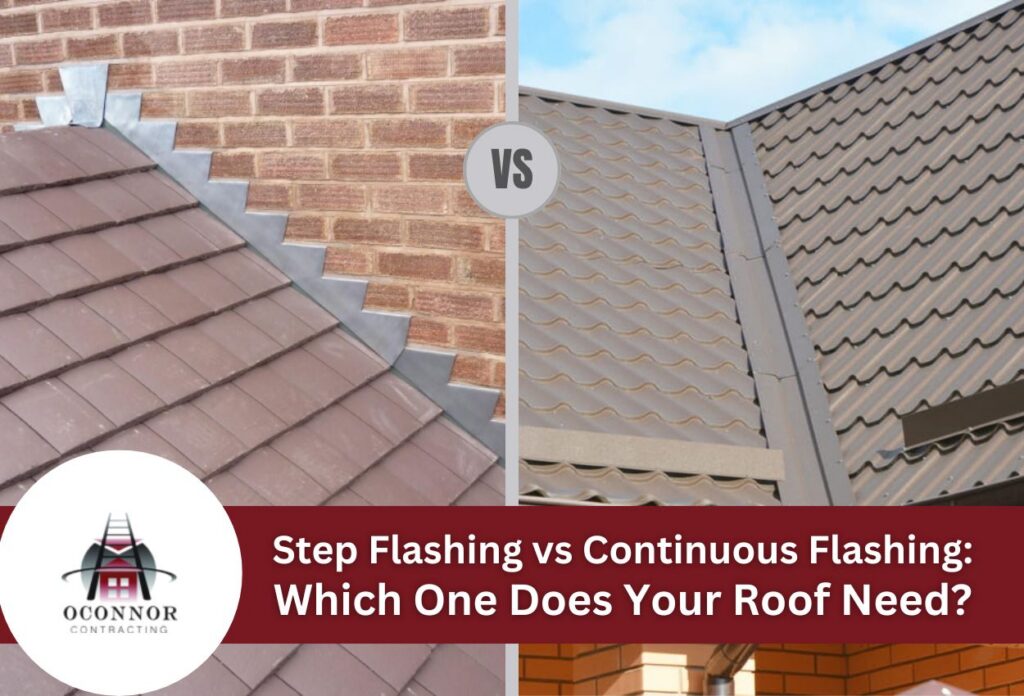

Step flashing is installed piece-by-piece in overlapping L-shaped sections, typically 8″x8″ at roof-to-wall intersections with shingles, while continuous flashing runs as a single bent metal strip along long horizontal junctions. Choosing the wrong type is one of the leading causes of flashing leaks in Buffalo homes, where aging construction and harsh winters put every roof junction to the test.
Most single-family homes in Buffalo were built between 1900 and 1950. They feature pitched roofs with brick or wood-frame walls, the exact conditions where step flashing is most commonly required. If your home fits that description, step flashing is likely what you’re dealing with, or what you need.
*Please note that price ranges listed in this article may not reflect the final cost of your project. Prices are subject to change based on various factors such as local labor rates, material quality, and more. All costs established in this article are rough estimates based on average industry rates.
What Are the Real Functional Differences Between Step Flashing and Continuous Flashing?
Step flashing and continuous flashing serve different junctions, use different installation methods, and perform differently under Buffalo’s temperature changes, and the table below shows exactly how they compare across 6 key factors.
| Feature | Step Flashing | Continuous Flashing |
|---|---|---|
| Unit size | 8″x8″ per piece | Single strip, up to 10 ft+ |
| Typical application | Roof-to-wall intersections with shingles | Long horizontal junctions, dormers |
| Slope compatibility | 2:12 pitch or greater (up to 4:12. Step flashing is recommended above 4:12) | 3:12 pitch or greater |
| Material thickness range | 26 to 28-gauge galvanized steel | 24- to 26-gauge galvanized steel |
| Labor time per 10 linear ft | 1.5 to 3 hrs | 0.5 to 1 hr |
| Failure risk under temperature changes | Low: each piece moves independently. | Higher joints can crack or separate. |
Continuous flashing installs faster, but that speed comes with a trade-off. Buffalo averages 90+ freeze-thaw cycles per year, and step flashing’s interlocking design handles that repeated thermal stress far better than a single strip that can crack or pull apart at its joints. Each independent piece shifts slightly without affecting the others, a real advantage in older Buffalo homes with brick or wood-frame walls.
One common misconception worth clearing up: searching “step flashing vs. continuous flashing which is better for roof valleys” sends many homeowners in the wrong direction. Valleys use neither type. Open and closed valley flashing are the correct methods for that junction. Applying step or continuous flashing in a valley is a misapplication that leads to leaks.
Where Should Each Type Be Used: Chimneys, Walls & Low-Slope Roofs?
The right flashing type depends entirely on where it’s being installed: chimneys, roof-to-wall intersections, and low-slope roofs each require a different approach, and using the wrong one will cause leaks regardless of the quality of the material.
Chimneys: Step Flashing Plus Counter Flashing, Not One or the Other
Step flashing handles the sloped sides of a chimney, and counter flashing (also called cap flashing) seals the top: both are required together. Using only one will allow water in. Counter flashing must overlap step flashing by a minimum of 3 inches and should be embedded at least 1.5 inches into the masonry mortar joints per NY State Building Code. That embedded edge is what keeps wind-driven rain from pushing up and behind the flashing.
In Buffalo, most pre-1950 brick chimneys have deteriorated mortar joints that must be repointed before counter flashing is installed. Skipping this step voids most flashing warranties and is the leading cause of chimney-related leaks in older neighborhoods. No amount of quality flashing material will hold against crumbling mortar.
Roof-to-Wall Intersections and Low-Slope Roofs
At roof-to-sidewall intersections, step flashing is the right call on pitches at or above 4:12. On slopes between 2:12 and 4:12, continuous flashing is acceptable. Below 2:12, neither traditional step nor continuous flashing is sufficient on its own: membrane flashing with a minimum 4-inch overlap is required to handle water that moves slowly and pools rather than runs off quickly. For low-slope applications, learn more about residential flat roof installation and repair options that address these slope-specific challenges.
Matching the flashing method to the actual slope prevents the most common installation mistakes. When in doubt, measure the pitch before ordering materials or scheduling a repair.
How Do You Install Step Flashing on an Existing Roof Without Removing All the Shingles?
Step flashing on an existing roof can be installed by carefully lifting, not removing, shingle tabs at the wall junction, working one course at a time. For a typical 10-linear-foot repair, gather 15 to 20 pieces of 26-gauge galvanized step flashing (roughly $0.75 to $1.50 per piece), 1.5-inch roofing nails, one tube of polyurethane sealant, and a flat bar for lifting shingles without cracking them.
- Lift shingle tabs at the wall junction. Use a flat bar to gently pry up each tab. Do not remove full shingles unless they are already damaged.
- Slide each 8″x8″ step flashing piece into position. Place it under the lifted shingle and over the previous course, lapping a minimum of 2 inches over the piece below.
- Nail only the top corner of each piece into the wall. Use one roofing nail per piece: never nail into the roof deck, which restricts the natural movement that makes step flashing last.
- Apply roofing sealant only at wall contact points. Do not caulk the full face of the flashing piece. Sealing the entire face traps water instead of allowing it to drain.
- Re-seat lifted shingles and secure with roofing nails. Press each tab back down firmly before moving to the next course.
- Apply a bead of polyurethane sealant at the wall-flashing joint. This acts as a secondary barrier, not a substitute for proper mechanical installation.
In Buffalo, this work should only be attempted between May and October. Asphalt shingles become brittle below 40 degrees Fahrenheit, and lifting them in colder temperatures increases the risk of cracking, which creates new leak points rather than fixing existing ones. If the repair can’t wait, contact OConnor Contracting to handle it safely year-round.
Why Is Your Step Flashing Leaking at the Wall and Roof Junction, and How Do You Fix It?
Step flashing at a wall and roof junction fails for five specific, diagnosable reasons, and Buffalo’s cold winters, temperature changes, and older wood-frame construction make each one more likely than in milder climates. Identifying the exact cause before starting repairs saves time and prevents the same leak from returning.
- Missing or displaced pieces: Wind uplift or improper nailing can shift individual flashing sections out of position. Fix this by reinstalling each piece using the single-nail method, one nail at the top corner only, so each piece moves independently without pulling loose.
- Over-caulking: Sealant applied across the full face of the flashing traps water instead of redirecting it downslope. Remove the sealant completely and reinstall the flashing correctly, using sealant only at wall contact points.
- Nail corrosion: Galvanized nails used in older installations may corrode within 10 to 15 years, allowing pieces to loosen. Replace corroded fasteners with stainless steel or hot-dipped galvanized nails rated for exterior exposure.
- Wall rot: Wood-framed homes common in Buffalo’s pre-1950 housing stock are prone to sheathing or framing rot behind the flashing. Replace any rotted material before reinstalling flashing, or the new installation will fail within a few seasons.
- Ice dam backup: Ice dams thicker than 4 inches can force water up and under flashing pieces. The fix is adding an ice-and-water shield membrane from the eave up at least 24 inches past the interior wall line.
If more than 30% of flashing pieces show visible corrosion, bending fatigue, or separation, full replacement costs less in the long term than repeated spot repairs. Use that 30% threshold as the decision point between targeted residential roof repair and a full flashing replacement. For insurance purposes, Buffalo homeowners filing water damage claims should document whether the failure came from storm-driven ice damming, which may be covered, or from material deterioration over time, which typically is not. That distinction directly affects claim outcomes, so photograph the condition before any repair work begins.
What Does Roof Flashing Repair or Replacement Cost and When Does It Pay Off?
Copper flashing costs roughly 3 times more upfront than galvanized steel but lasts 2.5 to 3 times longer, making it cost-neutral or better over 30 years for Buffalo homeowners planning to stay put or sell to buyers who expect durable materials in older properties.
| Flashing Scenario | Material Cost | Labor Cost (Buffalo, NY) | Total Estimated Cost | Expected Lifespan |
|---|---|---|---|---|
| Step flashing repair (10 linear ft) | $8 to $15 | $68 to $150 | $75 to $165 | 15 to 25 years |
| Step flashing full replacement (per 10 linear ft) | $20 to $40 | $135 to $225 | $155 to $265 | 15 to 25 years |
| Continuous flashing replacement (per 10 linear ft) | $15 to $30 | $45 to $75 | $60 to $105 | 15 to 25 years |
| Chimney step + counter flashing (full set) | $80 to $160 | $270 to $525 | $350 to $685 | 15 to 25 years |
| Copper flashing upgrade (per 10 linear ft) | $80 to $150 | $135 to $225 | $215 to $375 | 50 to 70 years |
For Buffalo homeowners in pre-1950 homes or historic neighborhoods, the copper upgrade math is straightforward: one installation can outlast 2 to 3 galvanized replacements at similar or lower total cost over time.
Copper flashing at $8 to $15 per linear foot in materials versus $2 to $4 for galvanized steel is the key comparison: the cost gap closes fast when you factor in fewer replacements and lower long-term labor costs. The City of Buffalo requires contractor registration for residential construction and improvement work: unlicensed or unregistered work can void manufacturer warranties and flag issues during home sale inspections, adding hidden costs that wipe out any short-term savings.
Confirm your contractor holds an active City of Buffalo contractor registration before work begins. Homeowners planning a full residential roof replacement should factor flashing upgrades into the project’s scale at the same time to avoid paying separate labor costs later.
Ready to Stop Guessing and Fix Your Roof Flashing the Right Way?
Scheduling a flashing inspection between June and early September, Buffalo’s best working window, gives a licensed contractor time to catch failures before winter ice dams force water behind wall junctions and into your home. OConnor Contracting holds the NY State home improvement contractor license required for residential flashing work in Buffalo, NY, so any repairs meet code and won’t flag issues during a home sale inspection.
Don’t wait until a leak shows up on the ceiling. A residential roof inspection costs far less than the water damage repair that follows a missed failure.
Schedule your free roof inspection.
Not ready to schedule? Learn more about our roofing and flashing services.